Just an angel somewhere

-love angel-
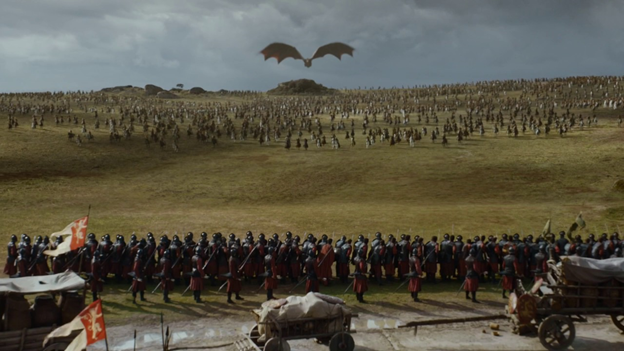
The results of fights in Game of Thrones Winter is Coming, are not determined by the power of players. Fights in this world are determined, by the Buffs and Bonuses of the two players and their strategies. A weaker player with the right formation and reinforcements can defeat a stronger enemy who is attacking arrogantly and with no proper strategy. In this guide, I will first do a short review about what we know about the battle mechanics in the current meta, then I will discuss formations and countering and related topics about advanced battling.
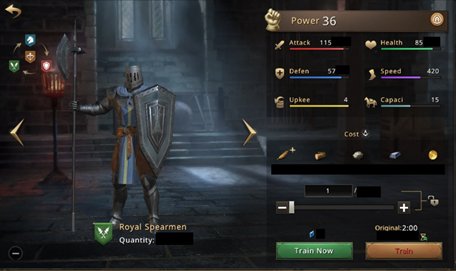
Troops Attributes
As you know there are 4 troop types in this game. Infantry, Cavalry, Spearmen, and Bowmen. Each of these troop types has 4 main attributes that are related to the way they act on the battlefield:
- Attack: This attribute determines the damage your troops can deal against the enemy. The higher it is; the more damage can be done to the enemy.
- Defense: This attribute is basically the direct counter to enemy attack, meaning it will reduce the damage caused by the enemy and will reduce your wounded/dead as a result.
- Health: This attribute determines the survivability of your troops. Basically the higher health your troops have, the more damage must be done to them to get them killed.
- Speed: This attribute affects several things:
> The higher this attribute is, the faster your troops move on the game map. Your speed on the map is determined by your slowest troops that are involved in the march.
> Troops take some time to reach the fight to be able to damage the enemy. The higher this attribute is, the faster that troop type will join the battlefield.
> Troops take some time off, between each of their attacks. The higher this attribute is, the more times, they will deal damage to the enemy during the fight.
The following formula is very naively showing the main battle formula in this game and might give you a better sense of what is happening on the battlefield:

This formula is not accurate for several reasons that were discussed in the buffs and bonuses guide, but it’s giving a close to reality and good sense about the way the troop attributes affect each other.
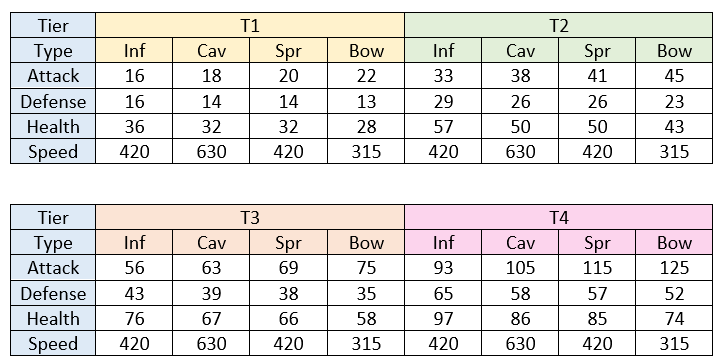
Here is a list of all troop attributes and base values in different tiers:
Discussing troop attributes and how exactly troops engage each other on the battlefield is a very large area to cover as there are a lot of variables involved in it.
In this guide, I’m about to focus on one specific event that happens during battle and that is called countering.
Countering
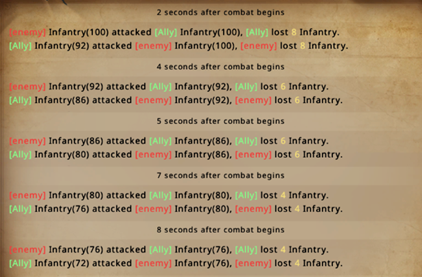
To show you the effect of countering, I’m going to start by providing some examples. Please look at the following 3 report logs, that are made by two fresh and new alt accounts with no buffs:
(Images are from the old version of battle reports but the mechanics are still similar)
1 - 100 T1 infantry vs 100 T1 infantry
2 – 100 T1 spearman vs 100 T1 spearman

3 – 100 T1 infantry vs 100 T1 spearman
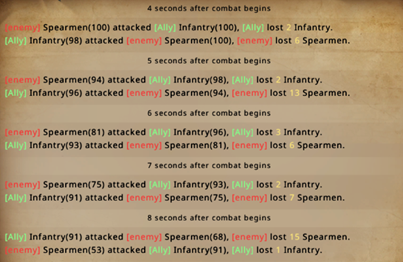
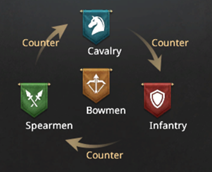
It’s not that hard to observe. The infantry is dealing two times more damage to the enemy spearman than what they were dealing against the infantry. This effect is called countering. Basically, this famous circle exists in this game:

Just like what it's drawn there, your cavalry deals more damage to enemy infantry. Your infantry deals more damage to the enemy spearmen and your spearmen deal more damage to enemy cavalry. This is called countering the enemy.
Few important things to note:
1 – The damage each side cause for the other side is calculated separately. I mean the damage you deal against the enemy, is based on your attack and their defense and health, and the damage they deal against you is based on your defense and health and their attack. These two are calculated separately at the same time and they have zero direct effect on one another. Although they have indirect effects on each other like “Moral” or with reducing the enemy army size as the battle progresses.
2 – Countering is a buff on your attack and getting countered means receiving more damage from the enemy. These are basically two different factors affecting your troops in different formulas (because of point 1 above)
3 - The troops should not be in the front row to counter the enemy, but troops can only get countered by one of the enemy’s rows as they can only attack the enemy front row. In other words, only the frontline troops can get countered.
Pay attention that countering is calculated for each pair of troop types that are on the battlefield separately. For example, if you attack an enemy with Infantry-Cavalry formation and the enemy has Spearman-Cavalry formation, the relationships there will be:
- Your infantry will counter the enemy’s spearmen (will deal two times more damage to them)
- Enemy spearmen is countered by your infantry (This means they are receiving more damage from your infantry)
- Enemy cavalry will counter your infantry (This means they will deal twice more damage to your infantry)
- Your cavalry is countered by the enemy Spearman (They will receive twice more damage from them)
Your infantry will only damage the enemy spearmen as long as the enemy has spearmen. If your Infantry dies, enemy spearmen will start countering your troops as your next frontline is cavalry.
Based on the battle reports and calculations the countering troops have twice more Attack against enemies.
Bowmen don’t counter any other troop types, but they have a higher base attack than the rest of the troops and any attack buff has more value for them. They have lower health and defense, however. Because of that, if you have bowmen, make sure that they are always behind a secure line of frontline armies.
Based on what was discussed we can change the last battle formula to this:

Some Definitions
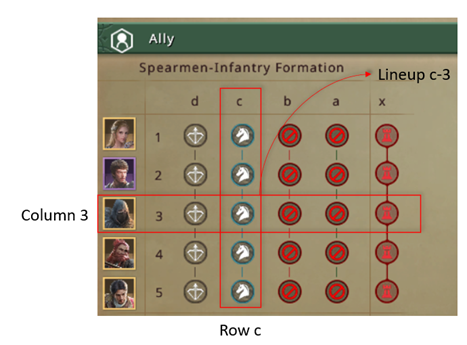
During the battle, your troops engage the enemy in a very special format. Imagine that the battle map is a chessboard. Then we can define:
- Row: Each side of the battle has its different troop types standing in different lines, with different distances from the enemy. In other words, all the Infantry troops stand in a separate line from all Cavalry troops and form a different line from the spearmen troops and a different line from the Bowmen troops. These rows are named a, b, c and d. Row d is always for bowmen. In case that the target has a wall and fortifications, they will take a special row called row x as well that is always in front.
- Lineup: Each row on the battlefield is divided into 5 groups, each containing 20% of your troops of that troop type. Each of these smaller groups is called a lineup. A lineup is like a cell on the battle chess table.
- Column: The lineups that are standing right in front of each other, form a column. Each column contains exactly 20% of the entire army and has troops from all troop types that are available in-game. In other words, we have 5 columns in battle. Each deployed commander stands with one of these columns based on the order in which they were selected. Columns are numbered 1 to 5. Lineups are named after the row and the column they are in.
Here is an image that shows this better:
Formations
Formations determine the order that your troops will engage the enemy. For example, Infantry-Cavalry formation means that your infantry will be on the first row and closer to the enemy, your cavalry will start in the second row, your spears will be in the third row and your bowmen will be at the last row.
Formations matter because of three reasons:
1 – formations and the speed of each troop (that I talked about their importance earlier) determine how fast they will reach the battlefield. The farther they are at the start of the battle, the later they will join the battlefield. Bowmen are always the last line of formations and since they have a slow speed they join the battles really late.
2 – Only your frontline can receive damage. This means if the enemy is not sending the counter troop type of your frontline, you won’t have a high casualty. This is exactly the same way for the enemy troops.
The infantry-cavalry formation is available for everyone as they start the game as the default formation, the other 5 types must be researched in “Maester’s Tower” in the “Formations” research branch. Since formations matter a lot in all fighting (PvE/PvP), they are on the list of the most important researches that players must focus on early in-game.
To choose the best formation for each attack/defense several things must be considered:
- Your frontline is what receives most of the enemy damage. 40% of the attacker's damaged troops always die regardless of hospital space (this is called the casualty rate and can be modified with dragon skills). It’s good to always use 1 tier lower army as frontline. For example, if your main army is royal (T4 troops) its best to have a shield of T3 troops (or even lower tier) as a meat shield, so as long as the enemy is killing them and dealing less damage to your main army, your army can kill their main troops from behind.
However, your "moral" drops based on the total loss you have, and using lower-tier troops increases your casualty. And reduces your "moral" faster so you have to find a balance for that. The army that reduces their enemy "moral" to 0 first, wins the fight.
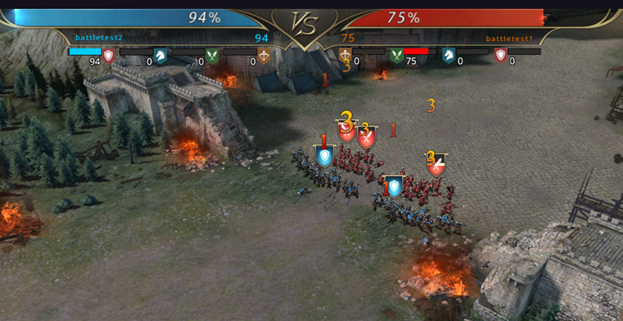
- It’s important to choose what formation you want to use based on the enemy troop count before their formation. For example, your enemy might be using full cavalry with Spearman-Infantry formation. This means if you try to counter them with Infantry (which is the normal counter to Spearman-Infantry formation), you will get countered badly and you will have a high casualty.
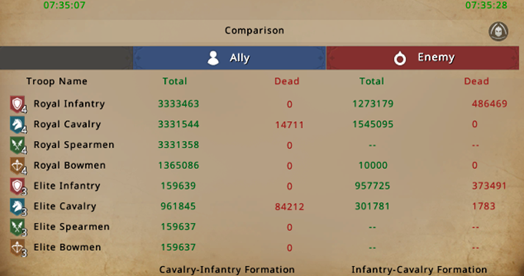
For example, even though the formations don’t look ideal on first look, since the enemy has a lot of cavalries and nearly no infantry, the full spear attack causes a massacre. (These images are from the old version of battle reports but the mechanic is the same)

- Here is a list of all formations and the best troops as frontline that can counter those formations without getting countered:
1- Infantry – Cavalry: Cavalry
2- Spearman – Infantry: Infantry
3- Cavalry – Spearman: Spearman
4- Infantry – Spearman: Infantry
5- Spearman – Cavalry: Spearman
6- Cavalry – Infantry: Cavalry
Pay attention that I’m not saying you should always use that mentioned troop type for each formation. I’m just saying that, for example, the most secure troop type vs an equal force of Infantry cavalry, is cavalry.
For example, by combining the points I mentioned above, you can fight with T3 Infantry and T4 Cavalry and T4 Spearman vs enemy Infantry-Spearman formation to reduce your loss and deal the most damage to the enemy.
Here are some additional things to consider:
1 – The default formation is Infantry – Cavalry. Using Cavalry as the main army in the early game is usually a great idea to counter the enemy Infantry.
2 – Your formation has nothing to do with the troops you send. I mean for example; you can send only the Infantry when your formation is Cavalry-Spearman. Formations only determine the order your troops will engage the enemy and won’t restrict you in any manner.
3 – Countering matters a lot, but buffs and troop ratio matter more. If you look at the troop's attributes that I posted earlier, you can see that higher-tier troops are nearly equal in stats. What makes your troops strong are the attack/defense/health buffs you have for them. Sometimes it’s best to use your best stats troops instead of what makes more sense with formations.
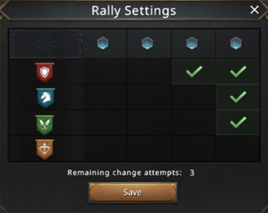
4 – Rally leaders can control the troops they receive when they start a rally from the toolbar on top. Using that and based on the formation they are using, they can control the ratio of each troop type for a better result.
Always pay attention that the order of rows is based on formation regardless if you have such troops or not. For example, if you use Spearmen Infantry formation, row a will be for Spearmen, row b will be for Infantry, row c will be for cavalry, and row d for bowmen. This is true even if you have 0 Infantry and spearmen like this example:
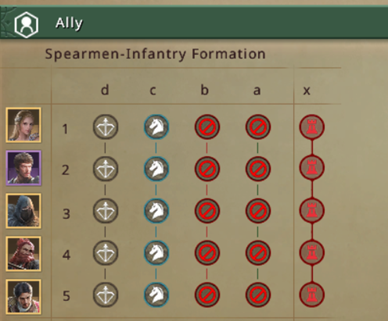
In other words, “Row a” is always for the frontline that is mentioned on the formation but that might be a false frontline as in the example above “Row c” with cavalry is the actual frontline. Also, note that “Row d” is always for Bowmen and row x is for “Wall and fortifications”.
Commanders
The last thing I’m discussing in this guide is the commanders you must use for fighting to use the Commander damage well.
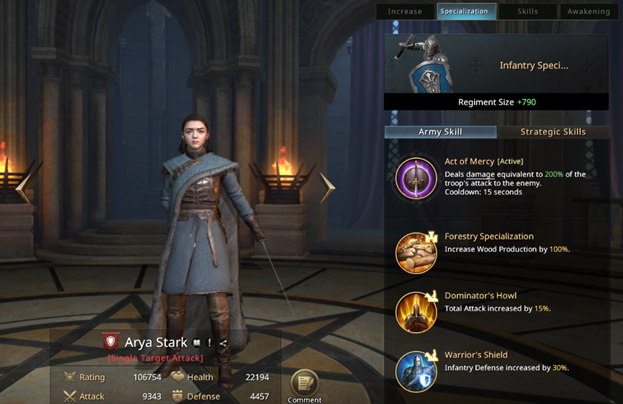
You can see that each commander can contribute to the battlefield in 3 different ways. For the first 2 check the “Specialization” tab on your commander’s page, and for the last one check the “Awakening” tab:
- The Army tactic (or the active ability): Like “Act of Mercy” by Arya. Each commander can attack the enemy frontline every few seconds. The damage of the commander will be based on the “Average damage” of the Lineups in their column regardless of the troop types and the troop countering bonus on the enemy.

This attack can be buffed with bonuses you can find in-game or by awakening commanders. The periods between they cast these skills will also reduce with awakening.
- The Military Passives: Like “Dominator’s Howl” and “Warrior’s Shield” of Arya. These passive buffs will apply to your army whenever Arya is included in the battle. You can see these buffs as commander’s bonus in the “Bonus” page of a report when you’re hovering over the related buffs. Awakening adds to commander military passive bonuses significantly.

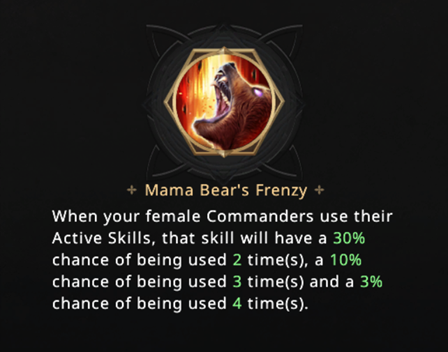
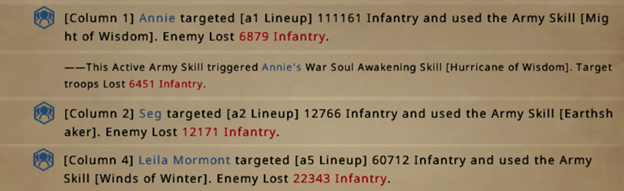
- Ultimate Awakening Skill: Commanders unlock their ultimate awakening skills when they become 4 stars. These skills are usually very powerful and if used well can affect the battle report drastically. For example, Leila Mormont has a very powerful awakening skill that will work alongside other female commanders and will buff the damage from their "active ability".
The experience proved that the passive buffs (Military Buffs) are generally more important than the army tactic, so it’s better if you send higher quality (preferably gold and awakened) commanders who will Buff your frontline’s health and defense and your armies attack whenever you’re attacking or defending. This, however, is not always the case with awakening available.
Commanders’ own stats don’t matter in normal fighting, their damage is based on the army which is with them in their column and their buff's quality is based on the quality of commanders (Their color) and the awakening. Commanders' levels are important for unlocking the specializations too.
Never use commanders who won’t buff your army even if you have them of higher quality. Commanders like Soren should never be used on the battlefield even if you have the gold and awakened.
The best commanders to be on your wall (for defense) are the ones that give a total bonus to all troops. Kevin, Seg, Arya, Tyrion, Sinara, Jaime, Leila, Theon, Margaery, Annie, and all the commanders which come in 1000 BD packs, Jon, Daenerys, Sandor, Baelish, Cersei are all total army buffers. Julian can also be considered a Total attack commander (since he buffs all three frontlines by 30% when gold which is even higher than the other total attack commanders). Rhea and Patelo are also great commanders as they add bonuses to different troop types.
It’s also pretty smart to use Sinara, Jaime, and Leila depending on your frontline as they have both total attack buffs and buffs for the frontline.
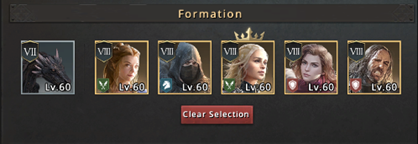
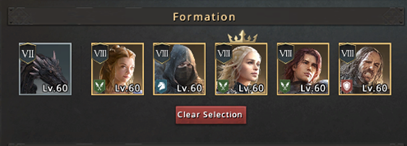
More importantly, it’s best to use your best-awakened setup on the wall. A full female setup with Leila Mormont is a great option for example. Or for example, commander Theon has a special awakening skill for defense on the wall, as he adds to total attack based on the number of troops you own for defending (up to 50% for 15m troops) which is great for defense.
Commanders Countering
Based on the test results, it’s obvious that commanders follow a similar pattern to troop countering for the damage of their "active ability".
In other words, Infantry commanders deal twice more damage when they are attacking Spearmen front lineup; Spearmen commanders deal twice more damage when they are attacking Cavalry frontline lineup and Cavalry commanders deal twice more damage when they are attacking Infantry frontline lineups.
In addition, Spearmen commanders have half the damage against Infantry frontline lineups; Cavalry commanders have half the damage against the Spearmen frontline lineups and Infantry commanders have half the damage against Cavalry frontline lineups.
Commanders counter the enemy troops based on their own type and the enemy troop type. It doesn’t matter what kind of troop their damage is originated from. In other words, it doesn’t matter if you have infantry or spearmen or cavalry troops. Your commander will deal the damage to the enemy based on their own type (Arya as an Infantry, Robb as a Cavalry, …)
This allows you to benefit from using different type commanders than your original troop type. For example, by using Spear commanders with Infantry troops, if the enemy uses cavalry troops to counter your troops, your commanders will have to counter bonus against the enemy troops and that increases your frontline survivability. But to use that you will need to use total attack commanders to be able to buff your troops with your passive specializations.
Some Interesting Reports
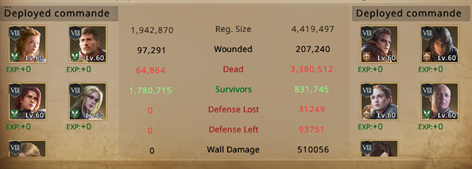
Posting these reports with permission from the people involved (sorry if they are partially not readable, I didn’t take the screenshots myself):
(Images are from the old version of battle reports)
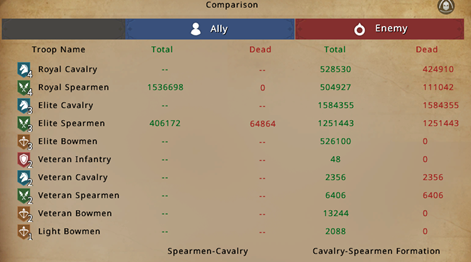
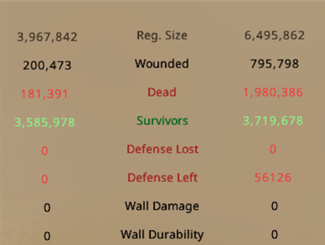
You can see how choosing Spearmen frontline vs Cavalry-Spearmen formation reduced the attacker’s casualty. The defender was using the wrong commanders on the wall as well.
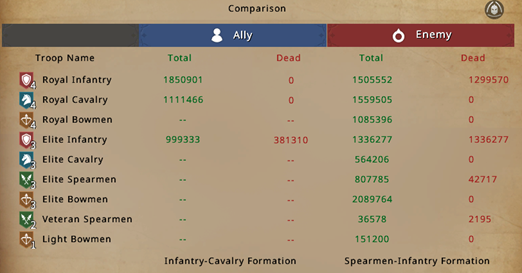
Infantry as frontline vs Spearmen-Infantry formation reduced the attacker’s casualty.
A good number of T4 cavalry in the backline killed the enemy Infantry as the attacker guessed correctly that the enemy had a lot of Infantry.
The defender (left one) has the correct formation and hard counters the attacker. Since the majority of the attacker rally is infantry and they don’t have spears, they break against the Cavalry Infantry formation.
Thanks for reading! I hope this guide helps your understanding of battle mechanics.
Suggested guides: Commanders, Buffs and Bonuses, Fighting as a zero castle.
Translate

-love angel-
Just an angel somewhere
Popular Posts
1
![[Quick Navigation][Updating]All Info You Need Is Here!](https://oss.gtarcade.com/forum/jpeg/2020-12-10/4_4e96f245-9418-4462-98f3-dcf53f2a9df1_222521.jpeg?x-oss-process=image/resize,w_150,h_150)
[Quick Navigation][Updating]All Info You Need Is Here!
2.3K discussions 332.8K views
2
![[Player Guide] Expeditions against rebel leaders (Updated 9/3)](https://oss.gtarcade.com/forum/png/2021-09-03/8644_f6ab4bda-c582-4df1-8d23-18bc9123fb91_155628.png?x-oss-process=image/resize,w_150,h_150)
[Player Guide] Expeditions against rebel leaders (Updated 9/3)
76 discussions 14.7K views
3
![[PLAYER GUIDE] A Summary of Main Events in Game (Updated on 2022/9/22)](https://lh5.googleusercontent.com/02aATo6ompr25fX16gR7XisQ-EcFsmvqf1lc00282RGbWjZfKz-N7RY2yuIcgbNhwwc90JqSUqrqa-kH-skVpI8ue7NzC39mOYuwBSr7cSYDlE8Zmki18EkbFZoziEf33uy-ZWL4c64840XxL-_Yoc7tZF-GoCwoRacYp4zkSYGIdRqIxyKv__-rEw?x-oss-process=image/resize,w_150,h_150)
[PLAYER GUIDE] A Summary of Main Events in Game (Updated on 2022/9/22)
137 discussions 4.5K views