Infinity Kingdom Press Officer

m a ë l
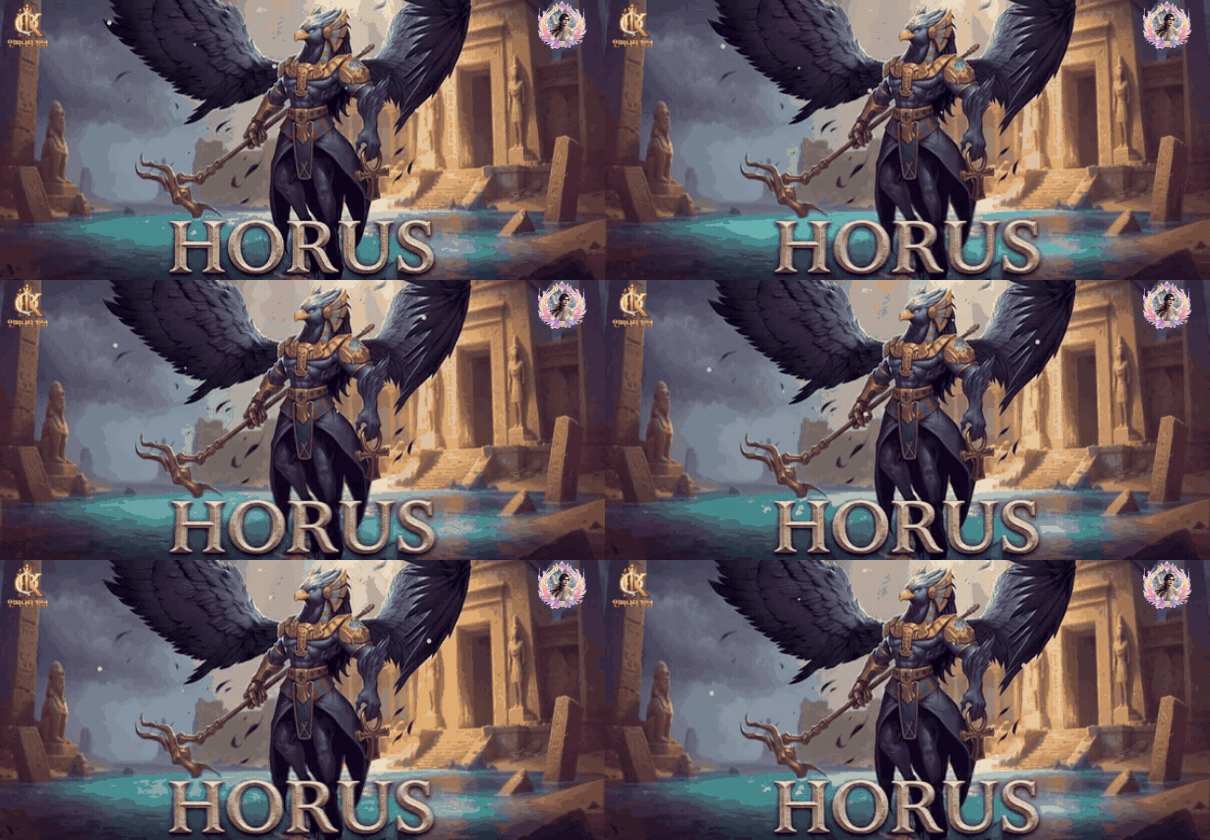
We predicted Horus could become one of Psychic Vortex's best users. Now, official battle data finally gives us something to test that theory against.
When Horus arrived, Royal Sarcophagus immediately made him one of the most intriguing Chaos Immortals in the game. A 5% damage cap per hit, powerful AoE Magical Damage and Punishment created an unusual profile: a back-row damage dealer built not only to hit hard, but to survive long enough to keep doing it.
Later, when we analysed Psychic Vortex, Horus naturally emerged as one of our Tier S candidates. The mechanics simply seemed to fit. But that was theory. With the developers now releasing their first detailed Horus battle analysis, including a recommended build featuring Psychic Vortex + Energy Mastery + Infinite Firepower, we finally have real numbers to work with.
And the result is worth a closer look. Horus finishes the official test with 59.8M damage, almost matching Medusa's 60.4M, while surviving a battle that sees the entire opposing formation eliminated.
So rather than introducing Horus all over again, this article will focus on one question: what does this first official performance actually tell us about Horus?
Table of Contents
- Horus and Royal Sarcophagus
- Psychic Vortex: From Theory to Official Build
- The Official Battle Test
- Horus vs Medusa: Reading the Numbers
- More Damage Taken, Still Alive
- Looking Beyond Horus
- What Did We Learn?
- Maël’s Opinion
1. Horus and Royal Sarcophagus
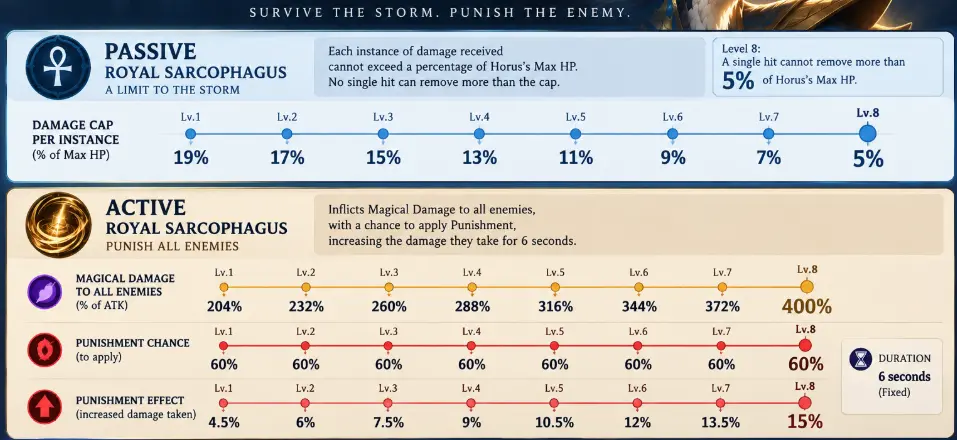
Horus arrived as a Chaos Magic Immortal commanding Bowmen, but Royal Sarcophagus immediately gave him a profile that is quite different from a traditional back-row damage dealer. At maximum level, its passive prevents any single instance of damage received from exceeding 5% of Horus’ maximum HP. This does not make him immune to sustained pressure, but it gives him significant protection against the heavy individual hits that can quickly remove a back-row carry from battle.
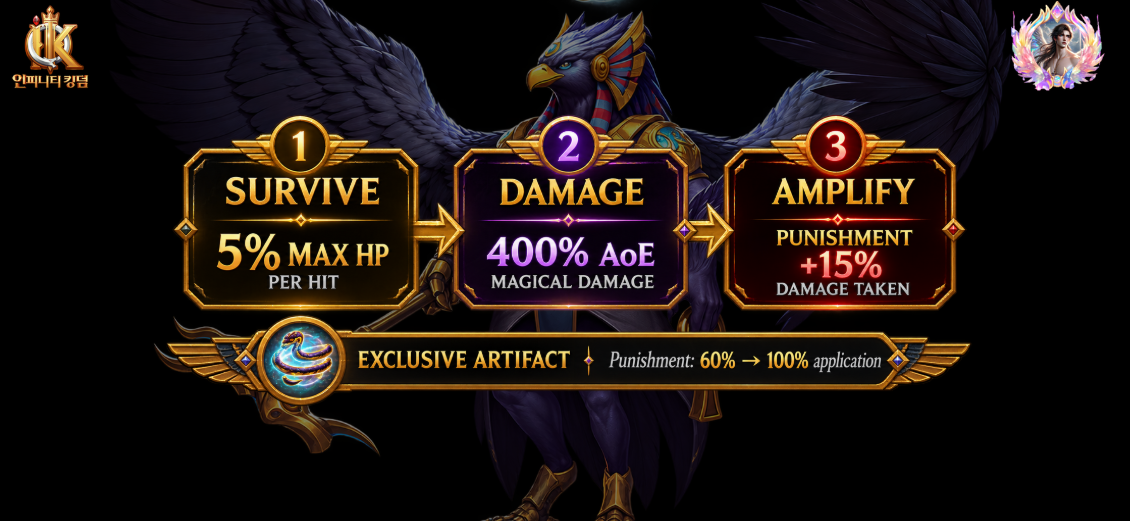
The active side of Royal Sarcophagus is much more aggressive. Horus deals 400% Magical Damage to all enemies and has a 60% chance to apply Punishment, increasing their damage taken by 15% for six seconds. His Exclusive Artifact, Eye of Horus · Annihilation, pushes the application chance of Punishment to 100%, making every successful Ultimate an opportunity not only for Horus to deal damage, but also for the rest of the formation to hit harder during the following six seconds.
This combination is what makes Horus interesting. His defensive mechanic gives him more opportunities to remain active, while his Ultimate rewards every additional cast with both AoE damage and team-wide offensive support. Rather than looking at Royal Sarcophagus as two separate effects, the real potential may come from how they work together: survive the pressure, keep casting, and repeatedly expose the enemy formation to Punishment.
Maël’s Opinion
The 5% cap is still the part of Horus’ kit I find the most important. We already have Immortals capable of producing huge damage numbers, but giving a back-row carry this level of protection changes how reliably that damage can be delivered. Horus does not need to become unkillable for Royal Sarcophagus to be valuable. He simply needs it to buy him enough time for another Ultimate, another Punishment window and another opportunity to influence the battle.
2. Psionic Vortex: From Theory to Official Build
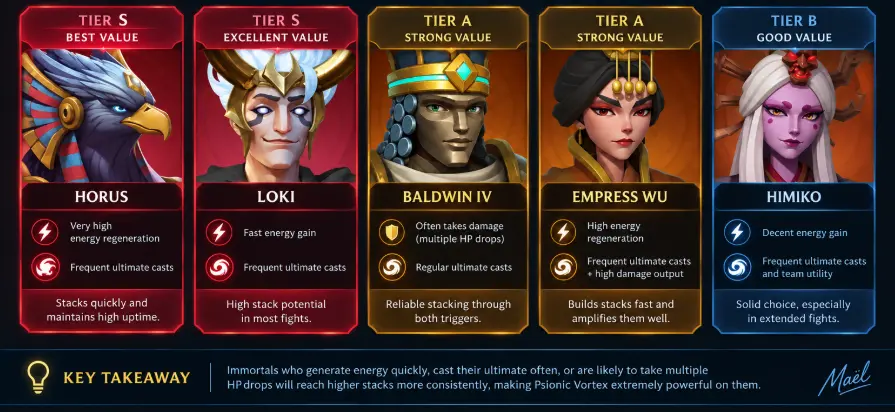
When we analysed Psionic Vortex, Horus immediately stood out as one of the Immortals most naturally suited to it. At maximum level, each stack increases Magical Damage by 30%, up to five stacks and a potential 150% increase. Stacks can be gained through HP loss and Ultimate activation, two conditions that fit particularly well with an Immortal designed to absorb pressure without being easily removed from the battlefield.
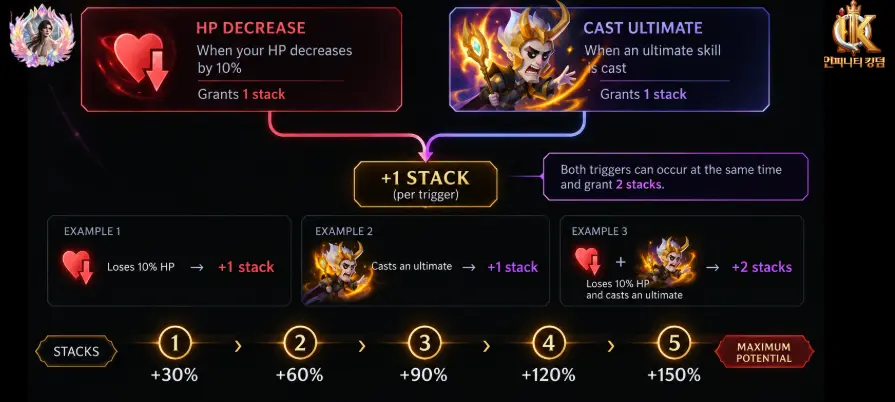
This is why we previously placed Horus in Tier S, Best Value for Psionic Vortex. Royal Sarcophagus gives him the protection needed to stay active, while every additional Ultimate gives him another 400% AoE attack and another Punishment window. Psionic Vortex adds a scaling component to that cycle: the longer Horus remains involved and accumulates stacks, the more dangerous his Magical Damage can become.
What makes the new official analysis particularly interesting is the recommended build. The developers pair Horus with Psionic Vortex + Energy Mastery + Infinite Firepower. Energy Mastery supports faster Ultimate cycling, while Psionic Vortex rewards those repeated activations with increasing Magical Damage. Infinite Firepower completes a setup clearly focused on allowing Horus to maintain offensive pressure rather than simply using his survivability defensively.
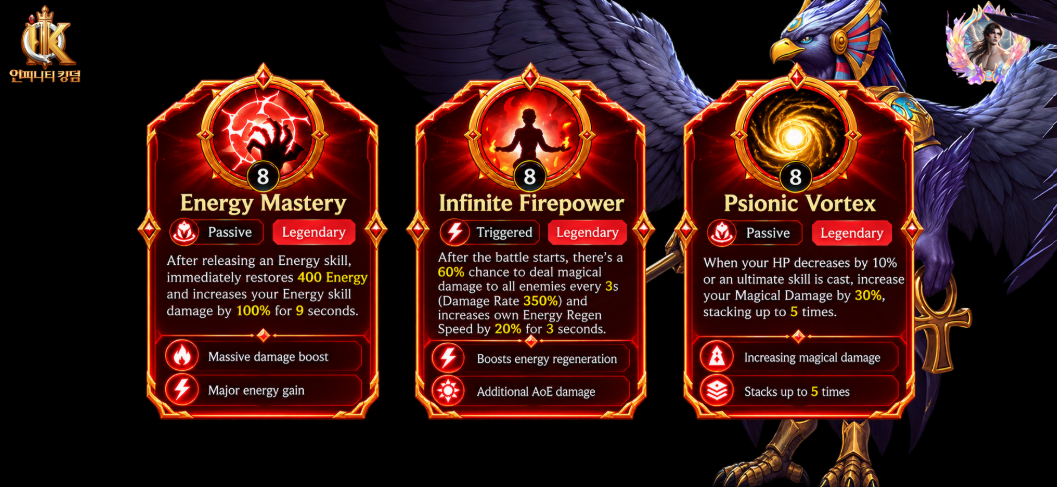
For us, this is an important confirmation of direction. It does not prove that Psionic Vortex is the only optimal way to build Horus, but the official recommendation follows almost exactly the logic we identified when the skill was released. Horus is not built to survive for the sake of surviving. He survives to keep his damage engine running.
Maël’s Opinion
Seeing Psychic Vortex in the official recommended build is probably the most satisfying part of this analysis. We identified Horus as a Tier S candidate before having this battle data, and the reasoning remains the same: few Magical carries combine his ability to take pressure with such a strong reason to keep casting.
The real question now is no longer whether the synergy makes sense on paper. It is what that synergy actually produces in battle. And this is where the official test becomes interesting.
3. The Official Battle Test
Now we get to the interesting part. The developers tested Horus in a complete Chaos-oriented formation with Ares, Great Tengu, Fu Fei and Horus, supported by the Holy Dragon. Opposite them were Ares, Anubis, Fu Fei and Medusa, also with the Holy Dragon. The battle lasted 1 minute and 22 seconds, with the Horus formation taking the victory.
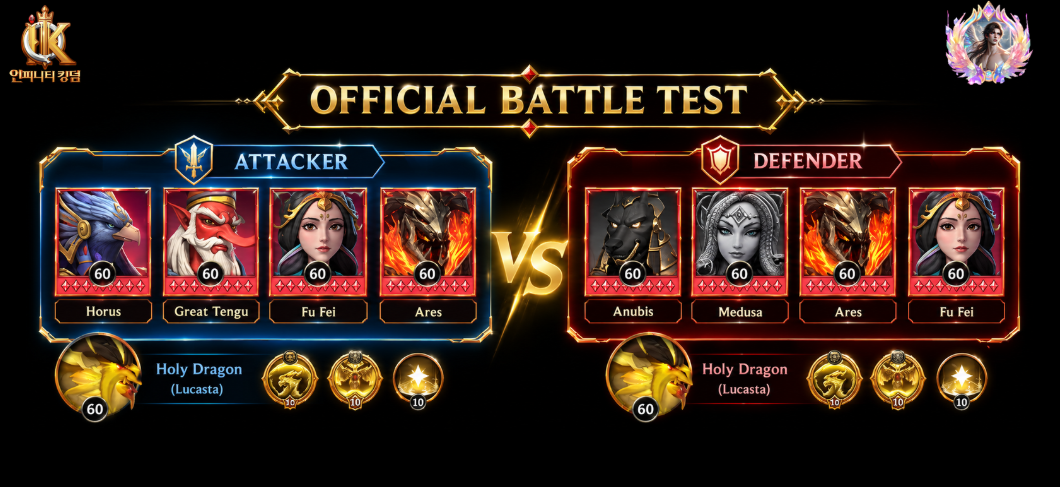
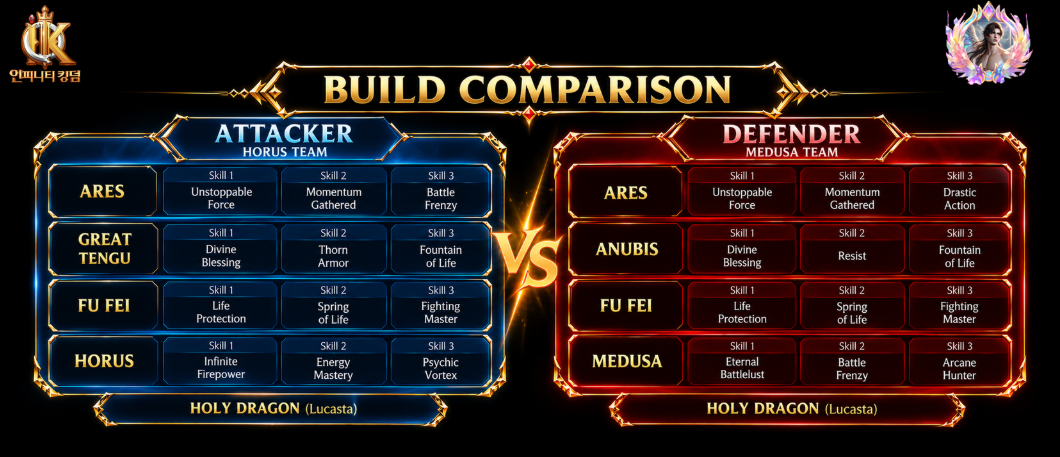
There is an important point before looking at the numbers: this is not a controlled Horus vs Medusa test. Great Tengu replaces Anubis, and several Tower of Knowledge skills are different between the two formations. We therefore cannot isolate Horus and conclude that the final result represents a direct comparison between the two Immortals. What we can evaluate is how Horus performed inside the recommended setup.
And the overall result is already impressive. The opposing formation is completely eliminated, while all four Immortals on Horus’ side remain alive. Fu Fei finishes with 16,784 troops, Great Tengu with 11,623, Ares with 4,465 and Horus with 4,095. This was not a battle decided by one last surviving Immortal. The entire formation made it through.
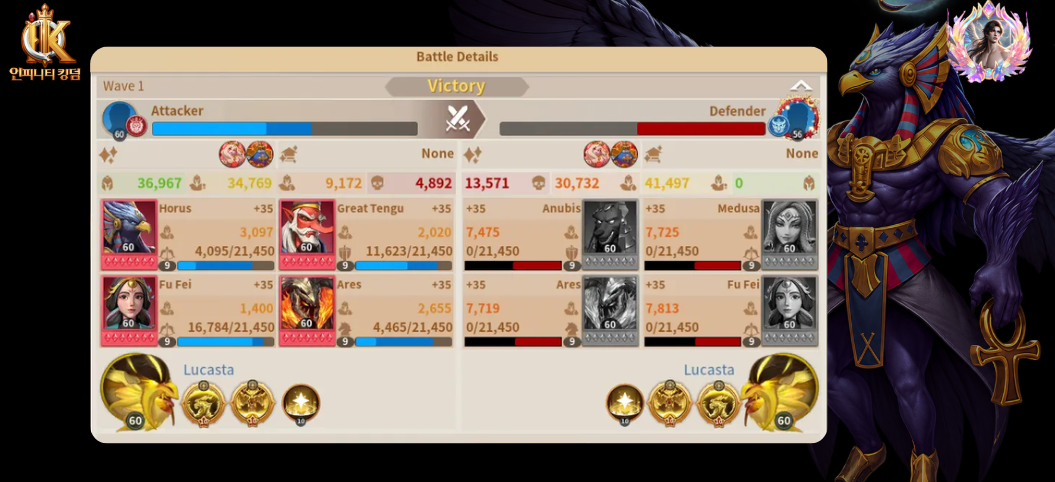
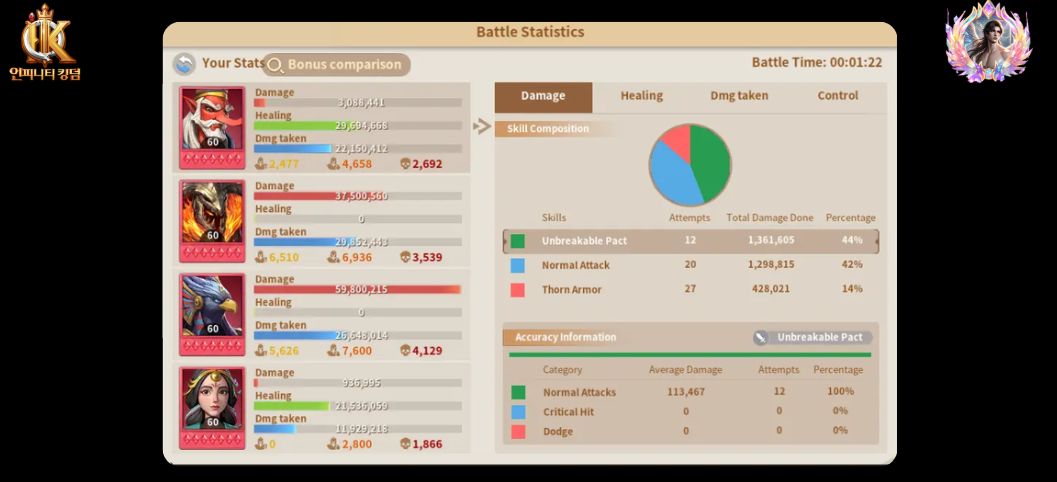
The damage statistics make the result even more interesting. Horus deals 59.80M damage, while Ares contributes another 37.50M. On the opposing side, Medusa reaches 60.39M, meaning she actually produces slightly more raw damage than Horus despite losing the battle.
That difference is tiny, around 0.59M, or roughly 1%. Horus essentially reaches the same damage range as Medusa in this particular test, but the context surrounding those numbers is completely different. That is where simply looking at the damage leaderboard stops being enough.
4. Horus vs Medusa: Reading the Numbers
At first glance, the damage comparison could hardly be closer. Horus finishes at 59.80M damage, while Medusa reaches 60.39M. A difference of less than 600K over an 82-second battle is almost negligible when both Immortals are operating around the 60M mark.
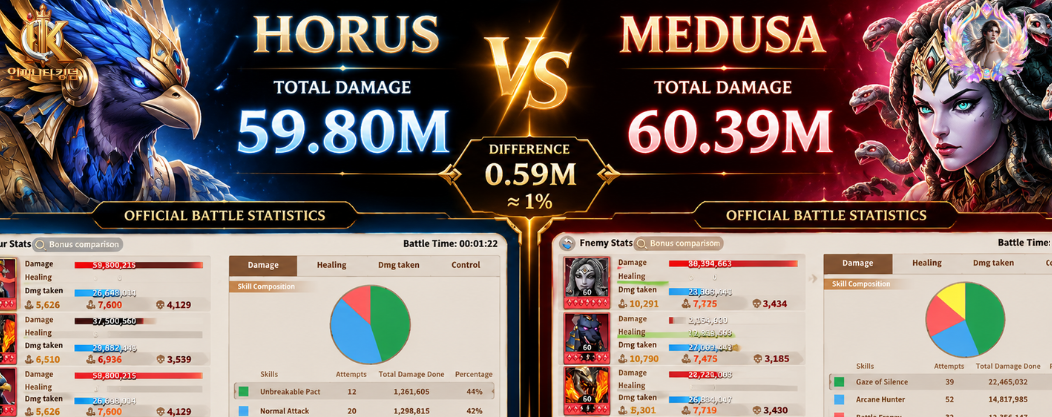
That alone is an encouraging result for Horus. Medusa has already established herself as a serious damage dealer, while Horus is entering the comparison with a kit that dedicates a significant part of its value to survivability and Punishment. Yet he is still able to operate in essentially the same raw damage range in this test.
The comparison becomes more interesting when we look at what Medusa needed to reach 60.39M. Her damage is spread across several sources: Gaze of Silence contributes 22.47M, Arcane Hunter another 14.82M, Battle Frenzy 12.36M, while the Mark component of Gaze of Silence adds approximately 8.66M. Medusa is doing exactly what we would expect from her build, combining her own mechanics with offensive Tower of Knowledge skills to maintain very high pressure.
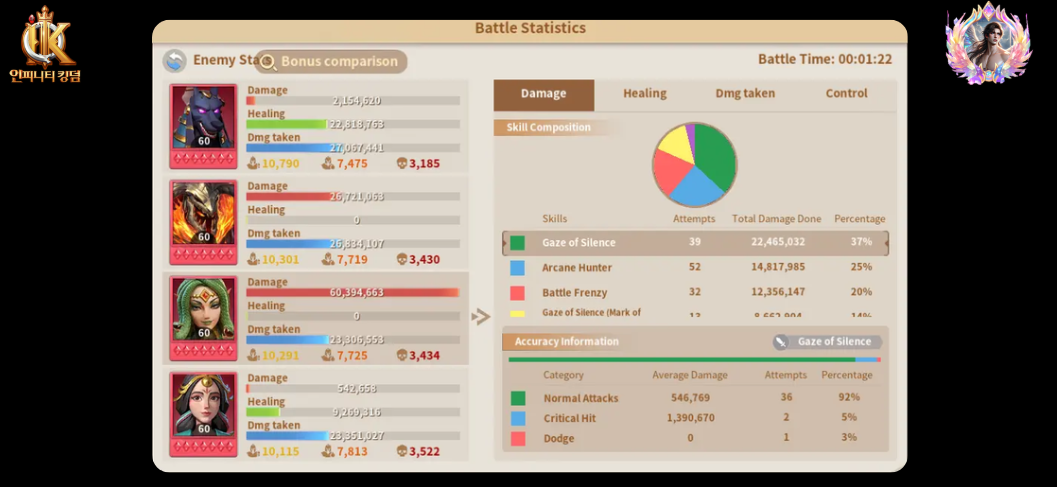
Unfortunately, the official screenshots do not provide the same detailed damage breakdown for Horus. We can see his total output, but not how much came directly from Royal Sarcophagus, Psychic Vortex, Infinite Firepower or his other damage sources. That prevents us from measuring exactly how much Psychic Vortex contributed to those 59.80M, and it is an important limitation of the test.
Still, the total tells us something useful. Horus does not need a defensive kit at the expense of damage. In this battle, he combines the protection of Royal Sarcophagus with almost 60M damage and repeated Punishment opportunities. The value of Punishment is also not fully represented by Horus' personal damage total, since increasing the damage received by his targets can benefit the rest of his formation as well.
So the most interesting takeaway is not that Medusa dealt 0.59M more damage. It is that two very different Immortals arrived at almost exactly the same personal damage output, while contributing to their formations in very different ways.
5. More Damage Taken, Still Alive
The damage numbers are close, but the Damage Taken column tells a very different story. Horus receives 26.65M damage during the battle, compared with 23.31M for Medusa. Despite taking more cumulative damage, Horus finishes the fight alive with 4,095 troops, while Medusa is eliminated.
This is where Royal Sarcophagus needs to be understood correctly. Its 5% limit does not mean Horus should finish a battle with a low Damage Taken number. The passive caps each individual instance of damage relative to his maximum HP, rather than reducing all incoming damage by a flat percentage. Over 82 seconds, smaller attacks and repeated damage instances can still accumulate into a very large total
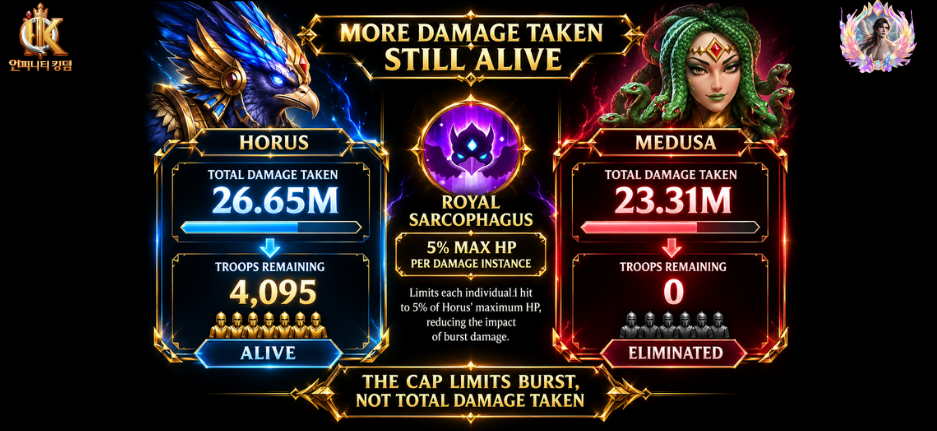
What Royal Sarcophagus appears particularly well equipped to prevent is the sudden burst capable of removing Horus before he gets another opportunity to act. In other words, 26.65M damage taken and still alive may actually tell us more about his defensive mechanic than a much lower number would. Horus was under significant pressure throughout the fight, but that pressure never translated into his elimination.
That matters because survival has an offensive consequence for Horus. Every additional second on the battlefield means more Energy generation, another opportunity to trigger Psychic Vortex, another potential Royal Sarcophagus cast and another Punishment window. His survivability is not separate from his damage engine. It is what allows that engine to keep running.
Maël's Opinion
This is probably the stat I find most interesting in the entire battle. 59.80M damage is impressive, but 26.65M damage taken while still standing tells us something more specific about Horus.
I would not read Royal Sarcophagus as a mechanic designed to make Horus finish battles untouched. That is clearly not what happened here. I see it more as protection against the moments that normally kill a back-row carry. Horus can still be worn down, and 4,095 troops remaining shows that he was far from invincible, but he stayed alive long enough to continue doing his job.
For me, that is much closer to what we expected when Horus was introduced: not an immortal Immortal, but a damage dealer who is unusually difficult to finish.
6. Looking Beyond Horus
It would be easy to look at the final screen, see Horus at almost 60M damage and make him responsible for the victory. The battle does not support such a simple conclusion. All four Immortals on his side survive, and the distribution of the remaining troops suggests a formation that continued functioning as a whole until the end.
Fu Fei finishes in particularly strong condition with 16,784 troops remaining, while Great Tengu still has 11,623. Ares and Horus are much closer to the limit, with 4,465 and 4,095 troops, but both remain active. On the opposite side, every Immortal is eliminated. The contrast is therefore bigger than Horus surviving Medusa: one formation managed to preserve all four of its components while progressively dismantling the other.
This is also why the difference between Great Tengu and Anubis cannot be ignored. The test changes more than the back-row damage dealer, and the Tower of Knowledge setups are different as well. Horus benefits from the environment around him just as Medusa does. Fu Fei's support, Great Tengu's contribution and Ares' 37.50M damage are all part of the final result.
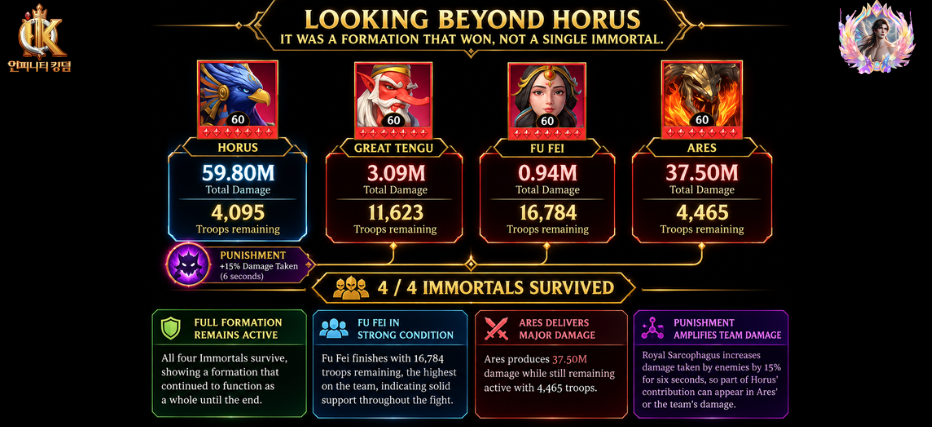
Punishment adds another layer to this. Horus' own 59.80M is easy to measure, but Royal Sarcophagus can also increase the damage enemies receive by 15% for six seconds. When Punishment is active, part of Horus' contribution can therefore appear in the damage produced by Ares or the rest of the formation rather than under Horus' own total. The battle report does not give us enough information to quantify that contribution precisely, so we should not try to assign a number to it, but it is part of what Horus brings to the march.
Maël's Opinion
This is where I would be careful with any claim that “Horus beat Medusa.” He didn't fight this battle alone, and neither did Medusa. Different teammates and different skills make that conclusion too easy.
What interests me more is the profile of the winning march. Horus nearly matches Medusa's personal damage while bringing Punishment and remaining alive, but he also leaves enough room for Ares to produce 37.50M of his own damage. That starts to look less like a competition for the biggest individual number and more like a formation in which Horus can contribute heavy damage without needing the entire march to revolve around his personal score.
7. What Did We Learn?
This first official test does not settle Horus' place in the meta, but it gives us encouraging evidence. He absorbs significant pressure, survives, and still produces 59.80M damage. More importantly, the developers' recommended Psionic Vortex + Energy Mastery + Infinite Firepower build follows the same direction we identified when Horus was released: keep him alive, accelerate his Ultimate cycle and let his Magical Damage scale as the battle develops.
Maël's Opinion
For me, Horus did not need to massively outdamage Medusa to make this test convincing. He almost matched her damage, took more total damage and survived, while contributing Punishment to a formation that finished with all four Immortals alive.
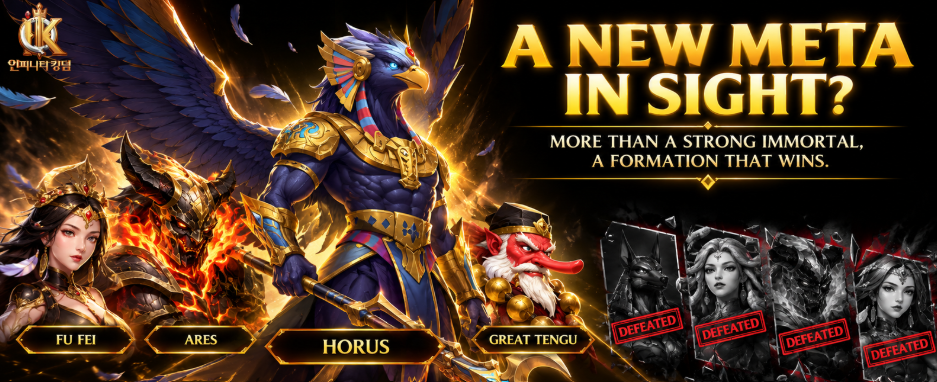
Horus arrived with one of the most unusual kits among recent Chaos Immortals. The combination of Royal Sarcophagus, Punishment , Psionic Vortex and strong back-row protection looked promising from the beginning, while Psychic Vortex gave us an early idea of how that design could be pushed further.
The first official battle data now gives that theory some substance. 59.80M damage, 26.65M damage taken and Horus still standing at the end of the fight is a strong first showing, especially alongside a recommended build that directly includes Psychic Vortex.
One test is not enough to define the meta, but Horus has passed an important first test: the mechanics that looked strong on paper are starting to make sense on the battlefield too.
For more insights, check out my previous articles here.
download Infinity Kingdom now and script your legend.
Translate

Popular Posts
1

Jadwiga: Twin Crowns and Hybrid Team Potential
269 discussions 428 views
2

"Flavio Belisario y la Maldición de la Esperanza" [Rincón de las Historias] - Infinity Kingdom
162 discussions 230 views
3