This user has no description yet

huehue#1
Water Marches:
Attack or Defense?

Introduction
There are many different playstyles and combinations in Infinity Kingdom, but when it comes to water marches, players are constantly choosing between offense and defense. In this article, I compare an offensive water march against a defensive one to see which performs better in practice. The aim is not to declare a single “best” setup, but to show how opponent matchups, game modes, and spending levels all affect whether a water march should be built aggressively or defensively.

Setup
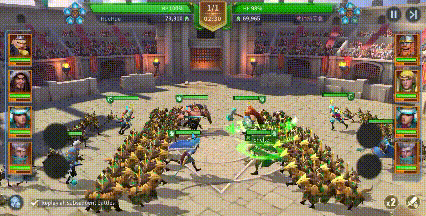
This comparison uses two marches with the same backline damage core but different frontline designs. Both marches run Merlin and Yoshitsune in the backline to keep damage output consistent. The difference comes from the frontline choices: the defensive march pairs Harald with King Arthur, while the offensive march uses Ragnar and Attila. This makes it possible to compare defensive and offensive frontline styles directly, using an Arena fight as the example.
To understand why these two marches perform so differently, it helps to look at how their skills are set up. While both sides use similar roles, the skills they equip push them in very different directions, one focused on pressure and damage, the other on survival and control.

Offensive Skill Setup
The offensive march is built to hit hard early and keep pressure on the enemy.
Merlin is set up for damage, not survival. His ultimate hits the whole enemy team and benefits from debuffs already in play. Annihilation and Death Breath add repeated group damage, while Poison Thorn targets strong frontline attackers and reduces their healing. This setup expects Merlin to do damage quickly rather than last a long fight.
Yoshitsune supports this with burst and scaling damage. His ultimate fires multiple arrows and hits harder against weakened targets. Weakness lowers enemy resilience from the start, Cleave adds splash damage, and Battle Stance delays his power early before giving him a strong damage spike later.
Ragnar adds control and setup. His ultimate boosts magical damage taken, helping Merlin hit harder. Weakening Curse lowers enemy damage early, No Escape adds silence and stuns, and Oaken Guard reduces physical damage on part of the team.
Attila keeps the fight aggressive. His ultimate disrupts enemies in front of him and weakens their defences. Blade Vortex adds repeated physical damage and Tear effects over time, rewarding constant pressure rather than short bursts. Fighting Will and Executioner trigger extra damage and control as the fight goes on. He works best when the battle stays fast and messy.
Overall, this march is designed to win through pressure and damage. If the enemy survives the opening, its impact drops off quickly.

Defensive Skill Setup
The defensive march is built to absorb damage early and slow the fight down.
Merlin’s ultimate still deals group damage, but the rest of his setup focuses on keeping him alive long enough to keep casting. Water Protection reduces critical damage taken and heals him when he is hit, making him hard to kill quickly. Poison Thorn and Annihilation add steady damage over time, so he keeps contributing as the fight drags on.
Yoshitsune helps limit early damage. His ultimate adds reliable physical pressure, while Malice lowers enemy crit rate from the start, reducing sudden spikes. Garrote adds ongoing damage instead of relying on burst. War Blessing gives a small early boost without forcing the march to win fast.
Arthur protects the whole march, with most of that protection helping the backline. His ultimate reduces the damage Arthur takes and reflects part of it back, making enemies pay for attacking into him. Shelter provides repeated healing when the team takes damage, and Assist pulls damage away from fragile units and onto Arthur instead.
Harald strengthens the defense over time. His ultimate reduces enemy defense on his target and applies sustained pressure. Duel Master prevents Wound effects, Life Link spreads some of the damage he takes onto enemies, and Toxin Barrier lowers enemy physical damage the longer they keep attacking. Together, Harald and Arthur soak pressure and give Merlin time to take control of the fight.
On paper, these two setups are built to do very different things. The offensive march leans into damage, pressure, and disruption, while the defensive march focuses on survival, control, and outlasting the enemy. All of this is based on how the skills work mechanically. The next step is to see how those mechanics actually play out in a real fight.
Match Summary
This match ended quickly, finishing at just over one minute, which heavily shaped the outcome. A short fight favors pressure and disruption over long-term defense, and the offensive march was able to control the pace from the start.
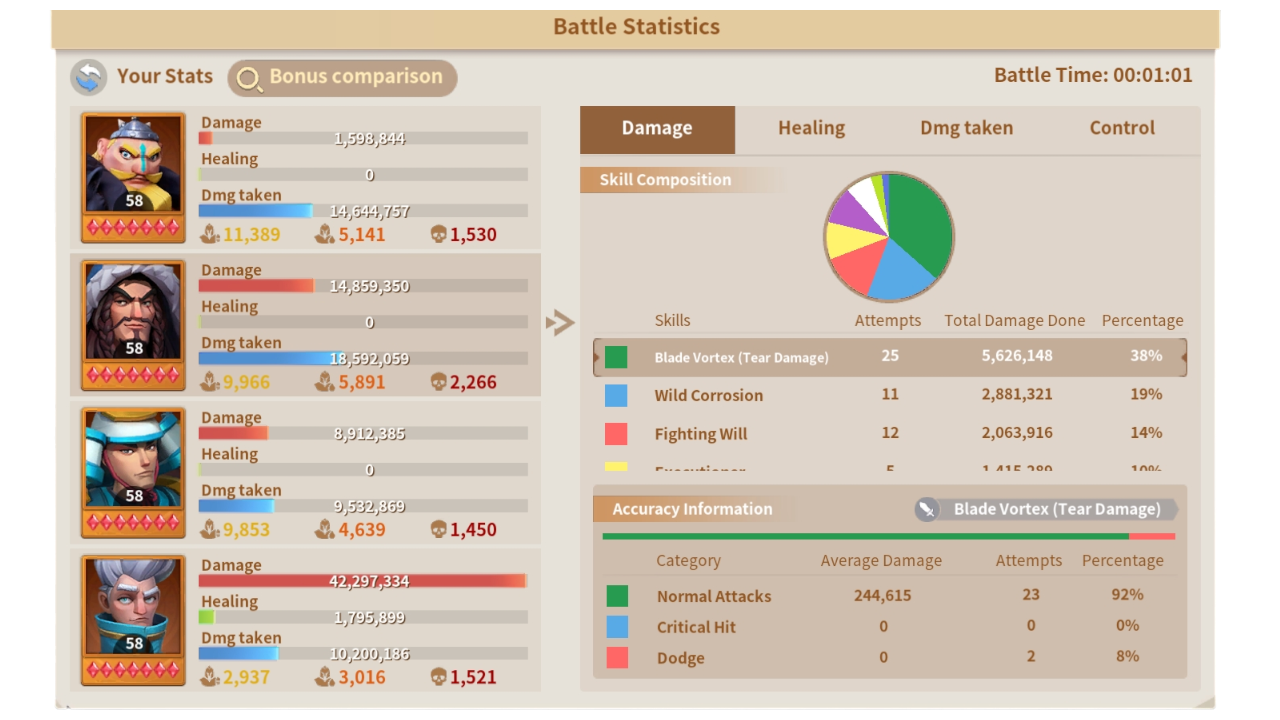
The offensive frontline applied constant pressure. Attila’s Blade Vortex contributed a large share of his damage through repeated Tear effects, while Wild Corrosion and Fighting Will triggered often enough to keep damage rolling. This meant the defensive frontline was under steady pressure and never had time to stabilize. Ragnar added to this by landing silence and stuns with No Escape and lowering enemy damage early, which delayed defensive ultimates and healing.
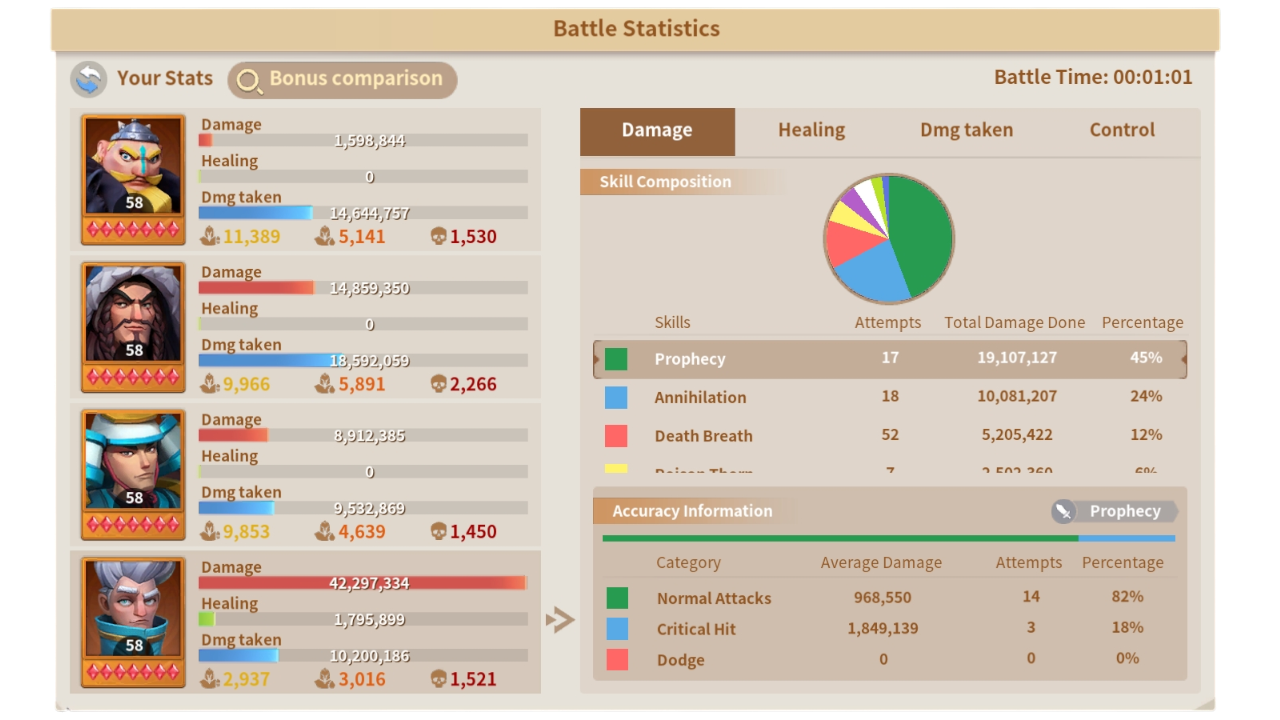
Merlin on offence was able to cast freely. Prophecy was his largest damage source, supported by Annihilation and Death Breath, allowing consistent group damage before defensive mitigation fully came online. Yoshitsune also performed his role, with Sky Feather making up the majority of his damage and helping finish weakened targets.
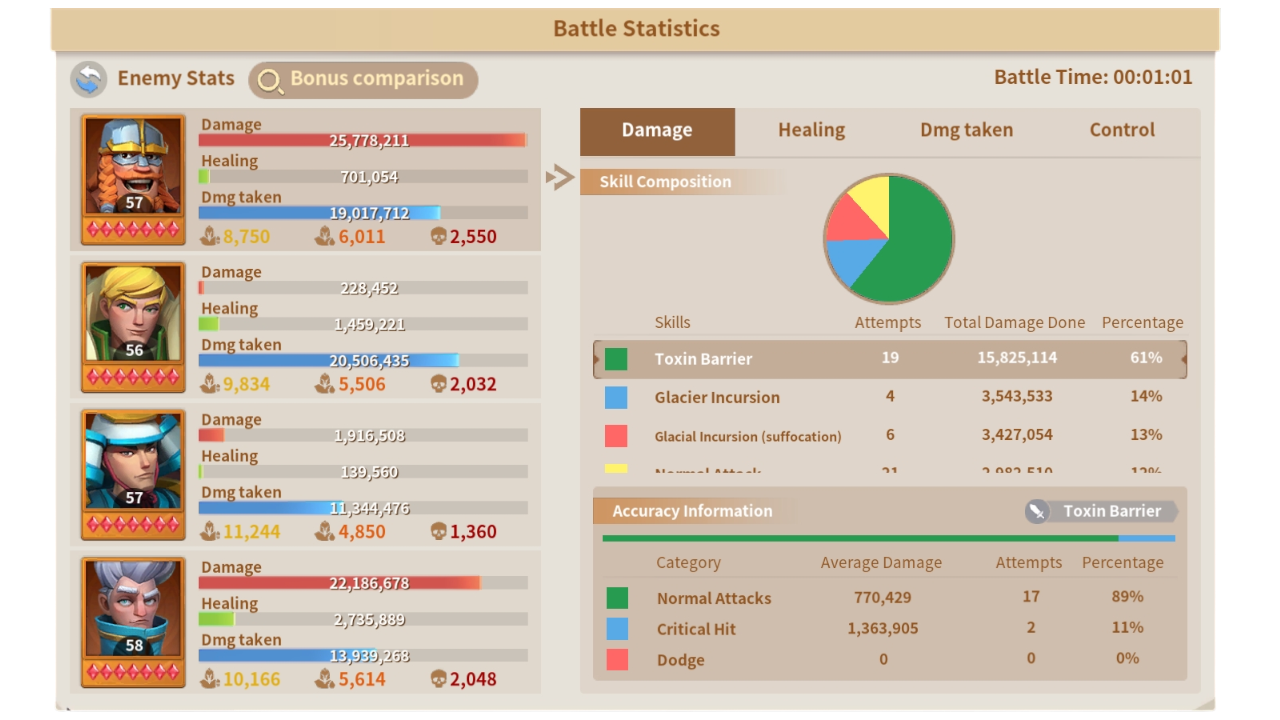
On the defensive side, much of the damage came from reactive effects rather than proactive pressure. Harald’s Toxin Barrier accounted for most of his damage, showing that value came from being hit rather than pushing back.

While defensive Merlin dealt meaningful damage through Prophecy, the fight ended before his sustain-focused setup could take control. Defensive Yoshitsune had limited impact, with few Sky Feather triggers and low overall damage.
Overall, the offensive march won by keeping the fight short and fast. Continuous pressure, crowd control, and damage over time prevented the defensive setup from reaching its stabilization point, leading to an offensive victory before defensive scaling could take over.
Conclusion
So, is a water march better built for attack or defense? For me, the answer leans towards attack.
In this example, the aggressive setup won because it controlled the fight from the start. Early pressure, crowd control, and constant damage meant the defensive march never got the time it needed to stabilize. Healing, damage reduction, and damage sharing all need time to matter, and in a short fight, they simply don’t get that chance.
That doesn’t mean defensive water marches are useless. In longer fights, or against weaker early pressure, they can still do their job well. But those situations are harder to guarantee. You don’t always get to choose how long a fight lasts.
An aggressive water march gives you more control. It lets you push the pace and end fights before defensive setups can take over. For that reason, if I have to choose one direction, I’d rather build water marches to apply pressure and win fast than hope a fight lasts long enough for defense to pay off.
Translate

Popular Posts
1

Bilinmeyen
56 discussions 59 views
2

Water Marches: Attack Or Defense?
161 discussions 210 views
3
Faltan publicaciones para reaccionar y lo demás.
298 discussions 310 views